|
Our first job is to create the Sprites which will be scrolled acorss the Stage Area as the boat travels up the river.
On loading the program, click on the Paint new sprite button above the Sprites List Area. |
This will take you to the Paint Editor.
Click a green colour for the banks of the river in the Colour Palette.
Click the Zoom Out control button to the left of the canvas towards the bottom of the Paint Editor window.
Click the Fill Bucket Tool in the Toolbox
Move the Fill Bucket to the canvas and click to fill the entire canvas with green |
|
|
Click the Eraser Tool in the Toolbox
Click the Eraser Size button in the Options Area beneath the Toolbox
Click the largest size for the Eraser Tool
Erase a wiggly line across the middle of the canvas. Try to ensure that the position of the erased area is roughly the same on each edge of the canvas as this will need to match up as the Sprite is scrolled across the Stage. |
Click a light blueish colour for the water in the Colour Palette
Click the Fill Bucket Tool in the Toolbox
Click anywhere on the erased section of river on the canvas.
Click the OK button to close the Paint Editor. |
|
|
We will now delete the Scratch the Cat Sprite (Sprite1). This could have been done earlier.
Right-click (Ctrl-click on a Mac) the icon for the Scratch the Cat Sprite in the Sprites List Area
Click delete in the pop-up menu
|
We will now create a Script to scroll the Sprite across the screen.
Click the Control button above the Blocks Palette.
From the Control Blocks Palette drag a when Green Flag clicked block into the Scripts Area
Drag a Forever loop block from the Blocks Palette into the Script Area and attach it beneath the when Green Flag clicked block. |
|
|
Scroll down the Control Blocks Palette and then drag an If loop block into the Script Area and insert it into the Forever loop. |
| Click the Operators button above the Blocks Palette and from the Operators Blocks Palette, drag a diamond-shaped [ ] < [ ] block into the Script Area and insert it into the diamond-shaped pane in the header for the If loop block. |
|
|
Click the Motion button and from the Motion Blocks Palette, drag a set x to [0] block into the Script Area and insert it into the Script beneath the when Green Flag clicked block
Now drag a set y to [0] block into the Script Area and attach it beneath the set x to [0] block.
This ensures the river Sprite always goes to the centre of the Stage Area when the game starts. |
| Drag a move 10 steps block into the Script Area and insert it into the Forever loop above the If loop block. |
|
|
Change the value of the move block so it reads move -10 steps
This will move the Sprite across the Stage Area from right to left rather than left to right. |
Drag an x position block into the Script Area and insert it into the first pane of the [ ] < [ ] block in the header of the If loop block.
Type -460 (ie minus460) into the second pane of the [ ] < [ ] block so the header of the If block now reads If x position < -460
This will detect when the Sprite reaches the left of the Stage Area. |
|
|
Now we must tell the Sprite what to do when it reaches the left edge of the Stage Area
Drag a set x to 0 block into the Script Area and insert it into the If loop
Change the value of the pane in this block so it now reads set x to 460
We are telling the Sprite to go to the right side of the Stage Area.
If you now click the Green Flag button above the top right corner of the Stage Area you will see the effects of this script.
Click the Red button beside the Green Flag button to stop the script. |
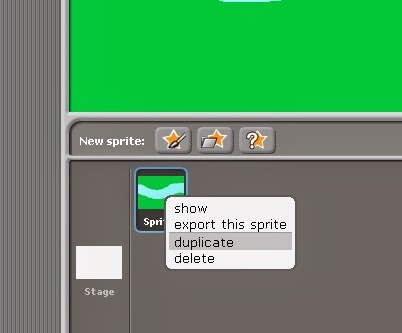
As you can see, one background Sprite is not enough. We need another one to follow this Sprite across the Stage Area.
The simplest way to create another Sprite similar to the this first one is to right-click (Ctrl-click on a Mac) the icon for the Sprite in the Sprite List Area and then click duplicate in the pop-up menu.
|
|
|
This not only makes of copy of the Sprite, it also copies the Sprite's Script.
Click on the new Sprite's icon in the Sprite List Area |
In the Script Area for this new Sprite, change the first set x to 0 block if the Script so it reads set x to 470
This places this second Sprite on the extreme right of the Stage when the Green Flag button is pressed and then moves it across the screen, following the first Sprite.
Click the Green Flag button above the Stage on the right to see how this works. If you feel the river looks a bit too uniform you could Edit the Costume for one of the Sprites to change the shape of the river section.
|
|
|
We are now ready to create a Sprite for the boat. Click the Paint new Sprite button above the Sprite List Area
Click a suitable colour for the boat (I've chosen brown) in the Colour Palette.
Click the Circle tool in the Toolbox
Draw an oval shape with the Circle Tool on the canvas. It doesn't matter what size it is for now as we can change the size later, if necessary. |
With the paintbrush tool, add more details to your boat such as a pointed bow (to the right of the shape).
Click Undo if you make a mistake.
Click OK when you are happy with your boat. |
|
|
|
If you feel your boat is too large for the river, click the Shrink Sprite button and then click on the boat Sprite a few times until it is the right size
You can enlarge it again if you become over-enthusiastic by clicking the Grow Sprite button beside the Shrink Sprite button and clicking on the Sprite.
NOTE: Clicking anywhere outside the canvas will 'unclick' the Shrink Sprite button |
We now need to write a script to control the boat.
Click the Control button above the Blocks Palette Area
Drag a when [space] key clicked block into the Script Area and change the block to read when [up arrow] key pressed by selecting this from the drop-down menu |
|
|
Show the Motion blocks in the Blocks Palette by clicking the Motion button above the Blocks Palette
Drag a point in direction [90] block into the Script Area and attach it to the when [up arrow] key pressed block
Change the point in direction block so it reads point in direction [(0) up] by selecting this from the drop-down menu
|
Drag a move 10 steps block into the Script Area and attach it below the point in direction 0 block
Test this new Script by pressing the up arrow key on the keyboard
You can move the boat Sprite back down the Stage Area by dragging it with the mouse pointer |
|
|
We could go through the above procedure again to create a Script to move the boat Sprite down the screen, but a quicker way is to duplicate the up arrow script
Right-click (Ctrl-click on a Mac) the when up arrow key pressed block and then select duplicate from the pop-up menu
Note: if you right-click any other block in the Script it will only duplicate the part of the Script from that block downwards.
|
Change the new Script so it reads:
when [down arrow] key pressed
point in direction 180 (down)
move 10 steps
|
|
|
By selecting from the drop-down menus
Test the new Script by pressing the up and down arrow keys on the keyboard
You will notice however, that the boat Sprite rotates to point in the direction it is travelling which is not helpful. |
To correct this rotation effect, click the Only face left-right button above the Script Area
Test your handiwork by pressing the Green Flag button and then controlling the boat Sprite with the arrow keys |
|
|
We now need to check whether the boat remains in the river.
Click the Control button and from the Control Blocks Palette, drag a when Green Flag clicked block into the Script Area for the boat Sprite.
Now drag a forever loop block into the Script Area and attach it to the when Green Flag clicked block |
| Scroll down the Blocks Palette and then drag an If loop block into the Script Area and insert it into the Forever loop |
|
|
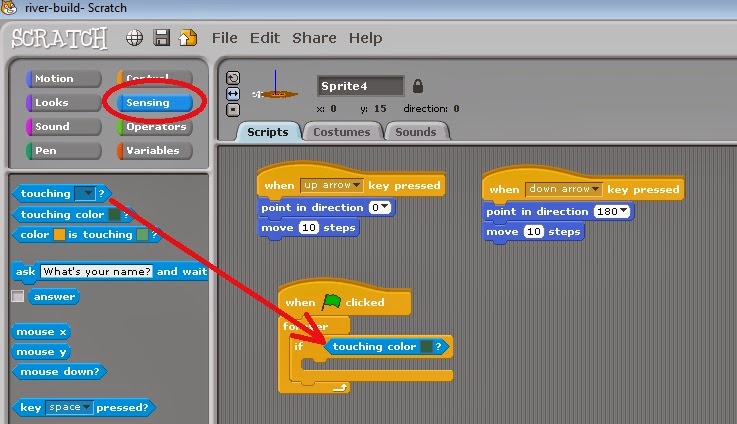
We need to insert a condition into the header of the If loop block to detect when the boat Sprite touches the banks of the river
Click the Sensing button and from the Sensing Blocks Palette, drag a diamond-shaped touching colour _ ? block into the Script Area and insert it into the diamond-shaped pane in the header of the If loop block |
Click the colour pane in the touching colour _? block and then click the eye-dropper tool on any part of the green colour in the Stage Area. This will set the touching colour _ ? block to detect when the sprite touches this colour.
|
|
|
We need to create a new costume for the boat Sprite to show the effects of running into the bank.
Click the Costumes tab above the Script Area and then click the Copy button
This will create a copy of the original costume for the Sprite which we can now Edit. Click the Edit button for this new costume. |
In the Paint Editor, use the paintbrush tool to show the boat in a crashed condition.
Click the OK button when done. |
|
|
Click the Scripts tab to return to the Script Area |
From the Looks Block Palette, drag a switch to costume [ ] block into the Forever loop between the header and the If loop block and, if necessary, change it to read switch to costume [costume1]
Drag another switch to costume [ ] block and insert it into the If loop. If necessary, change it to read switch to costume [costume2] |
|
|
From the Control Blocks Palette, drag a wait 1 secs block and insert it into the If loop below the switch to costume [costume2] block
Test the changes to the Script by pressing the Green Flag button and running the boat Sprite into the bank |
We could do with adding some sort of scoring system. To do this we need a variable in which to store the score.
Click the Variables button and then the Make a variable button.
In the pop-up window type Score for the variable name and then click the OK button
|
|
|
Drag a set Score to 0 block and insert it into the Green Flag Script immediately below the when Green Flag clicked block
This will set the score to 0 each time the game is played. |
To increase the score drag a change Score by 1 block and attach it below the when up arrow key pressed Script
Attach another change Score by 1 block to the when down arrow key pressed Script
If you now play the game by pressing the Green Flag button, you will see that the score increases each time you press the up or down arrow keys. The more the boat is moved by the player, the greater the score. |
|
|
We now need to decrease the score if the boat hits the bank
Drag a change score by 1 block and insert it into the If loop. Change the block to read change Score by -10
Now play the game to see what happens if you hit the bank
|
To make the game more interesting, we will add a timer so players have to race against time to increase their score.
Bring up the Sensing Blocks in the Blocks Palette by clicking the Sensing button.
Click the checkbox beside timer to show this Variable in the Stage Area
Now drag a reset timer block and insert it into the Green Flag Script beneath the when Green Flag clicked block. It doesn't matter if the reset timer block appears before or after the set Score to 0 block, as long as it comes before the Forever loop block
|
|
|
To stop the game when the timer reaches 30 seconds we need to set up a condition in an If loop
From the Control Blocks Palette, drag an If loop block and insert it into the Forever loop under the existing If loop. (You may need to try this a couple of times before you get the If loop block in the right place)
Drag a stop all block into the new If loop |
From the Operators Blocks Palette, drag a diamond-shaped [ ] > [ ] block and insert it into the diamond-shaped pane in the header of the new If loop block
|
|
|
From the Sensing Blocks Palette, drag a timer block and insert it into the first pane of the [ ] > [ ] Operator block in the new If loop block
Type 30 into the second pane of the greater than operator block so the If loop block header reads:
If [timer] > [30]
Test the game by pressing the Green Flag button |
To make the game even more interesting, create a High Score variable and create another If loop inside the timer If loop which reads:
If Score > High Score
set High Score to Score |
|
|
Last of all, to make the game even more challenging, you could create a Sprite representing an obstacle floating down the river. As long as the object includes a patch of the same green colour as the river bank then the boat sprite will detect a collision with it
The script for this obstacle I have suggested here hides this Sprite until the score exceeds 20. |


 The tutorials on this blog follow a simple principle; that programming should be purposeful. The outcome of each tutorial is a game which can be played in its own right and which can be further developed into something more challenging and complex. It is possible to follow each tutorial by following the step-by-step screen-shots only, but the text is also there to help you to acquire the terminology needed to support the children's learning and also to reinforce some key concepts of programming.