| Load up the program from either the website or using the download version. This is the start-up screen from Scratch 1.4 (the download version). The online version is similar but the various panes and and toolbars are in slightly different places. The online version includes some additional features which are not found in the download version - and so this tutorial will work with both versions. |
|
 |
The first thing we will do is provide a background for our game.
To change the design of the Stage (ie the background), click on the Stage icon in the Sprites Area
|
| Notice that the heading for the Script Area shows you are now working on the Stage. Click on the Backgrounds tab and then the Edit button beside the thumbnail image of the Stage. |
|
|
The Paint Editor pop-up window will now appear. Select the colour required for the background (in our case green) from the Colour Palette, and then click on the Fill Bucket in the Toolbar. Now click somewhere on the canvas to fill it with the desired colour. |
| Next we need to add a line on the left of the Stage. We will need to protect this line from being touched by the ball. Click on white in the Colour Palette and then the Line Tool on the Toolbar. Change the line thickness by clicking in the Options Area (where it says Brush Size) and then selecting a middle-sized brush. Drag the line from top to bottom along the left side of the Canvas. Click OK to finish. |
|
 |
Next we need to create a bat.
Click on the button to Paint a New Sprite in the Sprites Area
Sprites are objects which can be programmed with Scripts (see below)
|
This will take us once more to the Paint Editor.
Click on the Line Tool on the Toolbar. Then select a middle-sized brush size from the Options Area. Drag a vertical line somewhere on the Canvas about the size shown here. Then click OK to exit the Paint Editor |
|
 |
We could have done it earlier, but its now time to delete the default Sprite, Scratch the Cat.
Right click (or Ctrl-click on a Mac) on the Sprite 1 (Scratch Cat) icon in the Sprites Area and then click on delete from the pop-up list.
Alternatively you can Right Click (or Ctrl-click on a Mac) on the Sprite itself on the Stage Area.
|
| Now drag the bat sprite (Sprite 2) which we have just created to the left of the Stage, just in front of the white line. |
 |
 |
We are now ready to start programming.
Click the Control button to bring up the control blocks in the Blocks Palette.
Drag the when 'space' key is pressed block from the Blocks Palette into the Script Area.
This
control block senses which key is being pressed on the keyboard and
then carries out any instructions which are attached to it.
|
Click on the drop down menu on the block and click up arrow in the drop down list.
This tells the control block to respond whenever the right arrow is pressed on the keyboard. |
|
 |
Now we need to add some instructions to be carried out when the key is pressed.
Click on the Motion button and then drag the point in direction 90 block into the Script Area and then drag it to just below the control block so that it attaches itself to that block.
Now click on the drop-down menu and select (0) up from the list.This will tell the Sprite to face upwards so when it moves it will move up the screen.
|
Now drag the move 10 steps block from the Motion Blocks Palette and attach it to the point in direction block in the Script Area
This instruction tells the Sprite to move 10 steps in whichever direction the Sprite is pointing. |
|
 |
You can now test whether the instruction works by pressing the Up Arrow key on the keyboard.
You will notice that the Sprite twists
round to face in the upwards direction. This would be fine if it was a
boat, an animal or a car, but we want our bat to keep facing forwards.
To instruct the bat Sprite to continually face to the right, click the small only face left-right button in the pane above the Script Area
Drag the Bat Sprite back down the screen and try pressing the Up Arrow key again
|
You can probably work out for yourself how to make another block which tells the Bat Sprite to move down the screen when the Down Arrow key is pressed - but to save time, we will use the existing Script by duplicating it.
Right-click (Ctrl-click on a Mac) on the orange Control block at the top of the script we have just created and select duplicate from the pop-up menu |
|
 |
Change the orange control block to read when down arrow key is pressed by choosing this option from the drop-down menu.
Change the point in direction block to read point in direction (180) down.
Now test your two Scripts by pressing the Up Arrow Key and Down Arrow Key to see if the Sprite moves up and down the screen. If not, check the blocks match those shown here.
|
Now we have programmed the bat to move up and down, we need something for it to hit.
This time, instead of drawing our own ball, we will use an image from the Scratch program's library of image files.
Click on the Choose new sprite from file button in the Sprites Area |
|

|
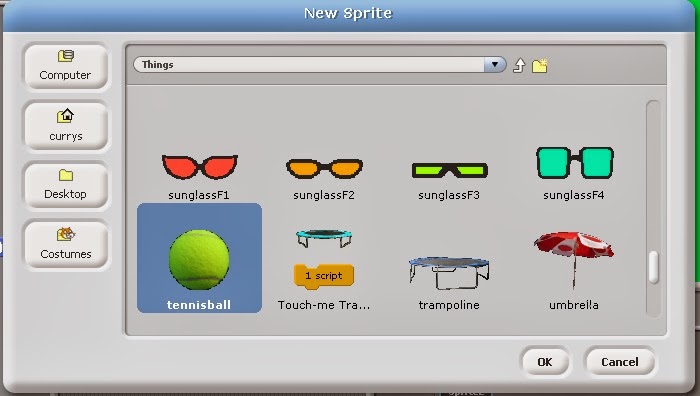
This will bring up the New Sprite Window. Double-Click on the Things folder. |
Scroll down the list of images in the folder until you reach the tennisball image.
Click on it and then click the OK button. |
|
 |
You should now have the new tennis ball sprite showing on the Stage Area along with the bat sprite.
However, it looks a bit too large so, to shrink it, click on the Shrink sprite button above the Stage Area.
|
Then keep clicking on the tennis ball sprite until it has shrunk to a reasonable size.
If you feel you have overdone it, you can enlarge it by clicking the Grow Sprite button beside the Shrink Sprite button and then clicking a few times on the tennis ball sprite. |
|
 |
Now we need to create a script to control how the ball sprite will move.
Click on the Control button above the Blocks Palette and then from the Blocks Palette drag the when green flag clicked block into the Script Area and then drag the Forever loop block into the Script Area.
Don't attach these two blocks together yet (it doesn't matter if you do though, you can always drag them apart again).
|
Now click the Motion button and then drag the point towards block into the Script Area and attach it below the when green flag clicked block. From the drop down menu on this block select Sprite 2.
This tells the ball sprite that when the game starts it is to point towards the bat sprite before moving. This will make the game easier to play at the beginning.
The drag the go to x: 0 y: 0 block into the Script Area and attach it beneath the point towards block. Change the value of x: to 200 by typing in the white area on this block.
Drag the Move 10 steps block into the Script Area and put it into the Forever loop. Then change the move 10 steps to move 5 steps.
|
|

|
Drag the if on edge bounce block from the Blocks Palette into the Script Area and attach it to the move 5 steps block in the Forever loop.
The drag the Forever loop block and attach it to the go to x: 200 y:0 block
You can now test the script controlling the ball sprite by clicking on the Green Flag button in the right hand corner above the Stage Area.
The ball should first jump to the right of the stage ( ie x: 200, y: 0 co-ordinates)
and then start moving across the stage towards the bat. When it reaches
the edge of the stage area it will bounce and so-on until you press the Red button beside the Green flag button. This stops all scripts.
|
Our next job is to get the ball sprite to do something if it hits the bat sprite. From the Control Blocks Palette, drag the If loop block into the Script Area.
You may need to scroll down the Block Palette Area to find the If loop block as it is somewhere near the bottom. |
|
|
Click on the Sensing button to bring up the Sensing Blocks in the Blocks Palette Area.
Drag the diamond shaped touching _ ? block into the diamond shaped area at the top of the If loop in the Script Area.
The click the drop down list button on the touching _? block and select Sprite 2.
This tells the ball sprite that it will need to do whatever is contained inside the If loop if it touches the bat sprite (ie Sprite 2).
|
We now need to program the instructions inside the If loop.
Click on the Motion button and from the Motion Blocks Palette, drag the point in direction 90 block into the Script Area and put it inside the If loop. |
|
|
As we want the ball to bounce off the bat in the opposite direction to that in which it was travelling when it hit the bat, we need to do a quick calculation as to what the new direction will be.
Click the Operators button and from the Operators Block Palette drag the oval shaped _ - _ block into the oval shaped pane on the point in direction _ block in the If loop in the Script Area.
|
To find out the direction the ball sprite is heading when it strikes the bat sprite, firstly type 360 into the first pane of the point in direction _ - _ block in the If loop.
Then bring up the Motion Blocks Palette by clicking the Motion button and from this drag the direction block into second pane of the the point in direction 360 - _ block
This tells the ball sprite that it needs to point in the opposite direction when it strikes the bat sprite (ie 360 degrees minus the direction it is now travelling). |
|
 |
Drag the If loop into the Forever loop so it attaches below the if on edge bounce block.
Drag the Forever loop up and attach it to the blocks below the when green flag clicked block.
The script for the ball sprite should now look like this.
You can test this new script by clicking the green flag button and watching what happens when the ball hits the bat.
When you are ready, stop all scripts by clicking the big red button beside the green flag button.
|
Now, let's add a sound when the bat hits the ball.
Click on the Sounds tab above the Script Area for the ball sprite.
The click on the Import button (or you could record your own sound if you prefer).
In the Import Sound pop-up window, double-click the Effects folder and from from this select the Pop file and click OK.
|
 |
 |
Click the Sound button above the Blocks Palette Area and drag the play sound Pop block into the Script Area and insert it into the If loop.
It doesn't matter if it attaches itself above or below the point in direction block as long as it is inside the loop (it doesn't matter if the pop sound comes before or after the ball sprite changes direction).
Click the Green Flag button to check this change to the script.
Click the Red button to stop all scripts when you are ready
|
Now we have programmed the sprites to do what we want, it's time to add some means of presenting this player with a score. For this we will need a variable called Score.
Click the Variables button above the Blocks Palette Area.
Then click the Make a Variable button
In the Pop-up window type Score for the variable name and then click the OK button.
|
 |
 |
You will see that the Score variable is displayed as a counter in the Stage Area. This can be removed by clicking the checkbox beside the Score variable block in the Blocks Palette Area
Drag set Score to 0 block from the Blocks Palette into the Script Area and attach it to the existing script under the go to x: 200 y: 0 block
Drag the change Score by 1 block from the Blocks Palette Area into If loop in the script (again it doesn't matter where as long as it is inside the loop).
You can check the effect of this change by clicking the Green Flag button to play the game and then the Red button to stop playing.
|
We now need to detect when we have missed hitting the ball.
Firstly, click the Control button and drag a new If loop into the Script Area from the Control Block Palette Area. For now do not attach it to the script.
Click the Sensing button and from the Sensing Control Block Palette, drag the touching colour _ ? block into the space at the top of the If loop block.
|

|

|
This If loop is going to detect whether the ball sprite touches the white line behind the bat sprite (ie if the bat has missed hitting the ball).
To ensure that the colour which the If loop detects is accurate, click in the colour pane in the touching colour _ ? block in the If loop block and then click on the white line on the Stage Area with the eye dropper mouse-pointer.
|
Import the BellToll sound file into the Sounds part of the Script Area (as above) - or any other sound which you think is appropriate.
Click the Sound button and then drag the play sound BellToll until done block from the Sound Block Palette into the new If loop in the Script Area.
Click the Control button and drag the Stop All block from the Block Palette into the If loop so it comes after the play sound BellToll until done block. It is important that these are in the correct order otherwise the script will stop before the sound has played.
|

|

|
Drag the new If loop into the Forever loop into the when Green Flag clicked script as shown.
As it is inside the Forever loop the script will keep checking whether the ball sprite is touching the white line as long as the game is being played.
You can now play the game by clicking the Green Flag button to see what happens if you miss the ball.
|
Next, it would be useful to record the Highest score and see if you can beat it it each time you play.
This will require another If loop in the script. This time we will need to drag the Greater Than Operator block into the space in the header for the If loop.
|
 |

|
Make a new variable called High Score and then drag the blocks into the If loop to make the following statement:
If Score > High score
set High Score to Score
|
This new If loop should now be dragged inside the If touching colour _? loop in the script (as shown).
It would still work outside this loop but the High Score is usually updated at the end of the game rather than during the game.
You could also drag the Score and High Score displays in the Stage Area so they do not hide the top of the screen where the bat needs to hit the ball. |
 |
 |
Finally, to make the game more difficult for those who become
skilful, let's make the bat smaller if they get a score higher than 15.
Click on the button for the bat sprite (Sprite 2) in the Sprite Area.
Then click on the Costumes tab
Click on the Paint button beside the New costume label. In the Paint Editor window, draw a shorter bat than the first one and then click OK
|
In the Script Area for the bat sprite, using your knowledge of programming create a new script:
When Green Flag clicked
Forever
If High Score > 15
switch to costume costume 2
as shown
Note: the switch to costume block is in the Looks Blocks Palette
|

|


No comments:
Post a Comment