|
Once the program has loaded, delete the Scratch the Cat Sprite by right-clicking (Ctrl-click on a Mac) on its icon in the Sprite List Area and then clicking delete on the pop-up menu |
Next, we need to create a background for the game.
Click on the icon for the Stage (to the left of the Sprite List Area). Then click the Backgrounds tab above the Script Area. Now click the Edit button beside the image for background1 of the stage. |
|
|
This will take you to the Paint Editor
Clear the current background image (plain white) by clicking the Clear button
Now click the Import button |
Double-click the Outdoors folder to open it and then click the brick-wall1 icon.
Now click the OK button |
|
|
This will import the image into the Paint Editor. At this point, we do not need to edit the image and so click the OK button. |
We're now ready to create a Sprite. This is an object which we can program to move around the screen.
Click the Choose new sprite from file button above the Sprite List Area.
|
|
|
Double click the Things folder and then click the manhole image. Now click the OK button
(Note you could double-click the manhole image to select it) |
| The manhole is a bit too large for our game and so we need to reduce its size. Click the Shrink Sprite button above the Stage Area (on the left) and then keep clicking on the manhole sprite on the Stage Area until it is about half its original size. |
|
|
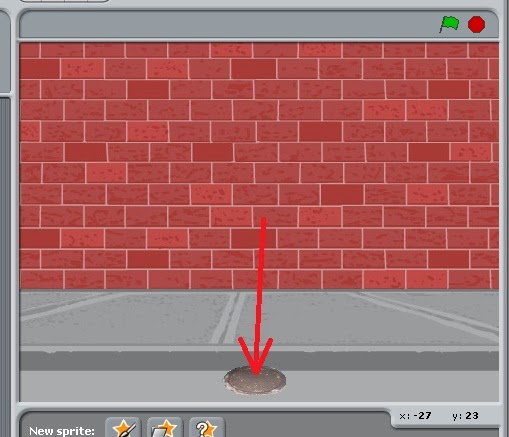
Now drag the Sprite towards the bottom of the Stage Area so it sits in the roadway by the kerb. |
We are now ready to write the Scripts needed to control the manhole Sprite
Click the Control button and then from the Blocks Palette, drag a when [space] key pressed block into the Script Area.
Edit the block so it reads when [left arrow] key pressed |
|
|
Click the Motion button and then from the Blocks Palette, drag a point in direction [ ] block into the Script Area and then attach it to the when [left arrow] key pressed block
Edit the point in direction [ ] block so it reads point in direction [-90] (left) |
Now drag a move [10] steps block into the Script Area and attach it to the point in direction [-90] block
You can now test your Script by pressing the left arrow key on the keyboard. |
|
|
We could repeat the above process to create a script to move the Sprite to the right, but to save time and effort we'll duplicate the Script and edit it.
Right-click (Ctrl-click on a Mac) on the when [left arrow] key pressed block and on the pop-up menu click duplicate |
| Edit the when [left arrow] key pressed block so it reads when [right arrow] key pressed |
|
|
Now edit the point in direction block so it reads point in direction [90] (right) |
Test your scripts by pressing the left and right arrow keys.
You might notice that when the manhole Sprite moves to the left it flips upside down. To stop this from happening, click the only face left-right button above the Script Area. |
|
|
Now we need to create a Sprite for the manhole sprite to catch. As there are no readymade raindrop images we will have to draw our own.
Click the Paint new sprite button above the Sprites List Area |
This opens the Paint Editor
Click a light blue colour in the Colour Palette and then the Circle tool in the toolbox.
On the canvas draw a circle. It doesn't matter what size as we can resize the Sprite later. |
|
|
With the Paintbrush tool, add some more detail to make it look more like a raindrop.
You can resize the Paintbrush by clicking the Brush Size button in the Options Area below the Toolbox
Click OK when done |
| Click the Shrink Sprite button and then click on the Raindrop Sprite a few times to reduce its size. |
|
|
We're now ready to write a script for this Sprite.
Click the Control button to bring up the Control Blocks in the Blocks Palette.
Drag a when Green Flag clicked block into the Script Area |
| Now drag a Forever loop block into the Script Area and attach it to the when Green Flag clicked block. |
|
|
Drag the Sprite to the top of the Stage Area and make a note of the co-ordinates for the centre of its new location. |
Click the Motion button and from the Motion Blocks Palette, drag a go to x: [ ] y: [ ] block into the Script Area and insert it into the Forever loop.
You may notice that the go to block already contains the present co-ordinate location of the Sprite - also the current location is shown above the Script Area. |
|
|
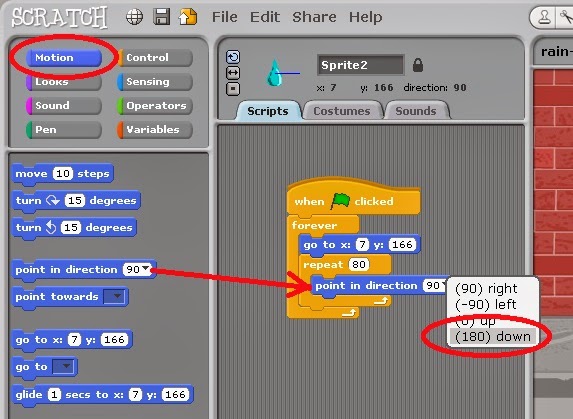
From the Control Blocks Palette, drag a repeat [ ] loop block into the Forever loop beneath the go to block and edit it to read: repeat [80] |
| From the Motion Blocks Palette, drag a point in direction block and insert it into the repeat [80] loop. Edit the block so it reads: point in direction [180] (down) |
|
|
Insert a move [10] steps block into the repeat [80] loop and edit the block to read move [5] steps |
Now test the Script by clicking the Green Flag button above the Stage Area on the right.
You will notice that the Script is highlighted when it is running. To stop the Script, click the Red button beside the Green Flag button. |
|
|
|
You will also have noticed that the raindrop twists through 90 degrees
when it falls. Sprites normally turn to face the direction they moving (as happened with the manhole Sprite). To overcome this, click the only face left-right button above the Script Area and run the Green Flag Script again. |
We now need to check whether the raindrop has been caught by the manhole.
From the Control Blocks Palette, insert an if loop block into the repeat [80] loop below the move [5] steps block |
|
|
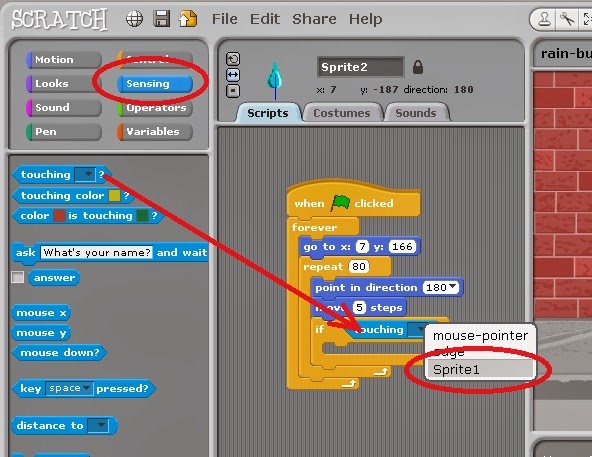
From the Sensing Blocks Palette, insert a diamond-shaped touching [ ]? block into the diamond-shaped pane in the header of the If loop block.
Edit the block to read If touching [Sprite1] ? |
Let's make a sound when the two Sprites touch.
Click the Sounds tab above the Script Area and then click the Import button |
|
|
Double-click (Ctrl-click on a Mac) the Effects folder and then click the Waterdrop file.
Click the OK button to import the sound file into the Sprite. |
From the Sound Blocks Palette, insert a play sound [ ] block into the If touching [Sprite1] loop
If you now test the Green Flag Script you should find that the sound is made when you yo catch the raindrop with the manhole. |
|
|
We now need to detect when a raindrop has been missed. To do this we need a strip of distinctive colour towards the bottom of the Stage Area.
Click the icon for the Stage beside the Sprite List Area.
Then click the Backgrounds tab and then the Edit button. |
Using the rectangle tool, draw a black strip across the roadway towards the base of the screen. Make sure this strip takes up about half of the roadway so there is a grey strip left below it.
Click OK when done. |
|
|
Now click the Raindrop Sprite (Sprite2) icon in the Sprite List Area and then the Scripts tab to show its script in the Script Area. |
| From the Control Blocks Palette, insert another If loop block below the one already in the Green Flag Script, immediately below the existing If touching [Sprite1] ? loop block |
|
|
From the Sensing Block Palette, insert a touching colour [ ] ? block into the header of the If loop block |
| Click on the colour pane of the touching colour [ ] ? block and then click with the eye-dropper tool on the band of black that you have just created on the background of the Stage. This will transfer that colour to the pane of the touching colour [ ] ? block. |
|
|
We'll now import another sound.
Click the Sounds tab and then the import button. |
| In the Effects folder, click the Plunge file and then the OK button. |
|
|
Click the Scripts tab and then from the Sound Blocks Palette, insert a play sound [ ] block into the if touching colour [ ]? loop.
If necessary, edit the block to read play sound [Plunge]
Test the Green Flag Script to compare what happens when you catch the raindrop and when you miss it. |
The game is a little too easy at the moment, so let's randomise the appearance of the raindrop Sprite.
From the Operators Blocks Palette, insert a pick random [ ] to [ ] block into the first pane of the go to x: [ ] y: [ ] block at the start of the forever loop in the Green Flag Script.
Edit the block so it now reads: go to x: [pick random [-240] to [240] y: [166]
The x co-ordinates of the Stage Area range from -240 (on the left) to 240 (on the right). The centre of the Stage Area is (0,0).
Play the game by clicking the Green Flag button to see the effects of this change.
|
|
|
We could do with adding some sort of scoring system.
Click the Variables button and then Make a variable. Give the variable the name Score and then click OK. |
Insert a set [Score] to [0] block into the Green Flag Script immediately below the when Green Flag clicked block.
Insert a change [Score] by [1] block into the If [touching [Sprite1] ? ] loop (it doesn't matter if it is above or below the play sound [WaterDrop] block.
Insert another change [Score] by [1] block into the If [touching colour [ ] ? ] loop and then edit the block so it reads change [Score] by [-1].
Now play the game. You'll see that the Score is now shown in the Stage Area and increases or decreases as the raindrops are caught or missed. You'll also notice that there seems to be a bug in the scoring system - this is because the raindrop Sprite touches the manhole Sprite and the black strip several times before it reaches the base of the Stage Area. |
|
|
There are several ways the bug could be overcome but I've opted to move the raindrop Sprite to the base of the screen immediately after it touches the manhole Sprite or the black strip (which is why we made the black strip only half the width of the roadway).
From the Motion Blocks Palette, insert a go to x: [ ] y: [ ] block into the if [touching [Sprite1]?] loop after the two other blocks in the loop and edit the block so it reads go to x: [0] y: [-180]
Insert another go to block into the other If loop and edit it in the same way.
Now play the game again and, hopefully, the scoring bug will be cured. Note: If you find that the manhole Sprite touches the raindrop sprite when it has been sent to the centre of the Stage, then drag the Manhole Sprite a little higher to clear it. |
Although the game is now quite playable, we can improve it still further by randomising the speed at which the raindrop Sprite descends. This will make the game more interesting when we add more raindrops. This also provides you with practice in editing an existing Script - which is useful if ever you want to change a game downloaded from the Internet.
Drag the entire repeat [80] loop out of the forever loop by dragging the repeat [80] loop header downwards.
|
|
|
Now drag the contents of the repeat [80] loop out of the loop by dragging the first block in the loop downwards. All the blocks attached to this first block should come with it. |
| Remove the repeat [80] block from the Script Area by dragging and dropping it into the Blocks Palette. |
|
|
Now drag a repeat until [ ] block into an empty space in the Script Area. |
| From the Operators Blocks Palette, insert a [ ] < [ ] block into the pane in the header of the repeat until block |
|
|
From the Motion Blocks Palette, insert a y position block into the first pane of the [ ] < [ ] block and then type -170 into the second pane, so the repeat until block now reads
repeat until [ y position ] < [ -170 ]
|
| Now drag the chunk of script starting with the point in direction block into the repeat until loop by dragging the first block, which should bring all the attached blocks with it. |
|
|
Now drag the repeat until block and insert it into the forever loop beneath the go to block
The reason why we've changed the repeat block is that when we randomise the number of steps the raindrop Sprite takes as it descends the screen, it will require a different number of repeats to reach the bottom. By using repeat until y position < -170 the loop will keep repeating until the raindrop sprite has reached the bottom of the Stage. |
We'll now create a variable to hold the value of the randomly generated step size for the raindrop's speed.
Make a variable called Speed - but make sure it is for this Sprite only by clicking the radio button. |
|
|
We don't want the Speed variable to show-up on the Stage Area so uncheck the checkbox beside the Speed label. |
Insert a set [ ] to [0] block into the Forever loop above the repeat until block.
If necessary, edit the block so it reads set [Speed] to [0] |
|
|
Insert a pick random block into the second pane of the set [Speed] to [ ] block and edit the block to read set [Speed] to [pick random [1] to [5]] |
Insert a Speed label block from the Variables Blocks Palette into the pane of the move [5] steps block in the repeat until loop so the block now reads move [Speed] steps
Play the game to see the results of these changes. |
|
|
To enhance the appearance of the missed raindrop Sprites we'll now add another feature - a costume change.
Click the Costumes tab and then the Paint button |
| Use the Paintbrush tool to create a splash image. Click OK when done. |
|
|
Click the Scripts tab to return to the Script Area |
From the Looks Blocks Palette, insert a switch to costume [costume1] block into the forever loop somewhere before the repeat until loop.
Insert a switch to costume [costume2] block into the if [touching colour [ ] ? ] loop somewhere before the go to x: [0] y: [-170] block |
|
|
Insert a wait [1] secs block into the if [touching colour [ ] ?] loop just above the go to x: [0] y: [-170] block |
| Play the game and check the effect when you miss a raindrop. If you find the splash is too small you may need to edit the costume in the Paint editor. Increasing the size of the Sprite with the Grow Sprite button will also increase the size of the raindrop. |
|
|
We'll now add another random element to the game.
Insert a wait [1] secs block into the forever loop somewhere before the repeat until block
|
Now insert a pick random block into the wait block in place of the [1] pane and edit the blocks so they read wait [pick random [0] to [3] ] secs
Play the game to check the effect of this change. Whilst this does not make an enormous difference to the game as it stands, it has a greater impact on the next change to the game. |
|
|
We're now going to duplicate the raindrop Sprite.
Right-click (Ctrl-click on a Mac) the raindrop sprite icon in the Sprites List Area and then click duplicate
Now try playing the game. The random speed and random timing features make the game a lot more challenging as the player needs to decide which raindrop to try and catch first. You could duplicate the raindrop again but this makes the game very difficult. |
On the last leg now. To finish off the game, let's set a time limit. We'll program this as a script attached to the background.
Click the Stage icon beside the Sprites List Area and create a Greeen Flag Script by dragging a when Green Flag clicked block.
To this attach a forever loop block and insert into its loop an if loop block
|
|
|
Into the pane of the If block header, insert a [ ] > [ ] Operator block |
Insert a reset timer block just below the when Green Flag clicked block
Insert a timer label block into the first pane of the [ ] > [ ] block and type 60 into the second pane so the blocks read If [[timer] > [60]]
|
|
|
Insert a stop all block into the If timer > 60 loop
Now play the game again. It will stop working after 60 seconds have passed. However, it would be very helpful if the player was informed that the game had finished. |
| Click the Backgrounds tab and then the Paint button |
|
|
You could fill the canvas with a plain colour, but let's experiment with one of the effects.
Select a lighter colour for the foreground colour and a darker shade of the same colour for the background colour.
Then click the graduated from centre button and then with the Fill bucket tool click on the centre of the canvas. |
Use the Text tool to write Game Over using a suitable font, text size and foreground colour.
Click OK when done. |
|
|
Click the Scripts tab and then insert a switch to background [background1] block just below the when Green Flag clicked block
Insert a switch to background [background2] block into the if timer > 60 loop above the stop all block
Check the game to see the effect of this change. |
To enhance the game further, it might be useful for the player to see how much time is remaining.
Make a variable called Time left |
|
|
Insert a set [Time left] to [60] block just below the when Green Flag clicked block
Insert a change [Time left] by [1] block into the forever loop before the if timer > 60 block |
Insert a [ ] - [ ] Operators block into the second pane of the set [Time left] to [ ] block and edit the blocks so they read set [Time left] to [60] - [timer]
The game is now more or less complete. You may want to play it a few times to see if you can maximise your score. |
|
|
You might want to add a High Score variable record the highest score.
Here is one way which it could be programmed. |


 The tutorials on this blog follow a simple principle; that programming should be purposeful. The outcome of each tutorial is a game which can be played in its own right and which can be further developed into something more challenging and complex. It is possible to follow each tutorial by following the step-by-step screen-shots only, but the text is also there to help you to acquire the terminology needed to support the children's learning and also to reinforce some key concepts of programming.