Search This Blog

Friday, 28 February 2014

Pong

Introduction

This is a simplified version of the classic ping-pong game. The tutorial shows images from the downloadable version of Scratch (1.4) but the programming will work in the same way on the on-screen version Scratch (2.0)

Techniques included

The programming techniques which this game includes are:
  • Drawing backgrounds
  • Drawing sprites
  • Importing sprites
  • Green Flag scripts
  • Key press scripts
  • Sprite touching sprite detection
  • Sprite touching colour detection
  • Adding sound to sprites
  • Updating score variable
  • Updating High Score variable
  • Changing sprite costume

Tutorial

Load up the program from either the website or using the download version. This is the start-up screen from Scratch 1.4 (the download version). The online version is similar but the various panes and and toolbars are in slightly different places. The online version includes some additional features which are not found in the download version - and so this tutorial will work with both versions.
The first thing we will do is provide a background for our game.

To change the design of the Stage (ie the background), click on the Stage icon in the Sprites Area
Notice that the heading for the Script Area shows you are now working on the Stage. Click on the Backgrounds tab and then the Edit button beside the thumbnail image of the Stage.

The Paint Editor pop-up window will now appear. Select the colour required for the background (in our case green) from the Colour Palette, and then click on the Fill Bucket in the Toolbar. Now click somewhere on the canvas to fill it with the desired colour.
Next we need to add a line on the left of the Stage. We will need to protect this line from being touched by the ball. Click on white in the Colour Palette and then the Line Tool on the Toolbar. Change the line thickness by clicking in the Options Area (where it says Brush Size) and then selecting a middle-sized brush. Drag the line from top to bottom along the left side of the Canvas. Click OK to finish.
Next we need to create a bat.

Click on the button to Paint a New Sprite in the Sprites Area

Sprites are objects which can be programmed with Scripts (see below)

This will take us once more to the Paint Editor.

Click on the Line Tool on the Toolbar. Then select a middle-sized brush size from the Options Area. Drag a vertical line somewhere on the Canvas about the size shown here. Then click OK to exit the Paint Editor

We could have done it earlier, but its now time to delete the default Sprite, Scratch the Cat.

Right click (or Ctrl-click on a Mac) on the Sprite 1 (Scratch Cat) icon in the Sprites Area and then click on delete from the pop-up list.

Alternatively you can Right Click (or Ctrl-click on a Mac) on the Sprite itself on the Stage Area.

Now drag the bat sprite (Sprite 2) which we have just created to the left of the Stage, just in front of the white line.
We are now ready to start programming.

Click the Control button to bring up the control blocks in the Blocks Palette.

Drag the when 'space' key is pressed block from the Blocks Palette into the Script Area.

This control block senses which key is being pressed on the keyboard and then carries out any instructions which are attached to it.


Click on the drop down menu on the block and click up arrow in the drop down list.

This tells the control block to respond whenever the right arrow is pressed on the keyboard.

Now we need to add some instructions to be carried out when the key is pressed.

Click on the Motion button and then drag the point in direction 90 block into the Script Area and then drag it to just below the control block so that it attaches itself to that block.

Now click on the drop-down menu and select (0) up from the list.This will tell the Sprite to face upwards so when it moves it will move up the screen.

Now drag the move 10 steps block from the Motion Blocks Palette and attach it to the point in direction block in the Script Area

This instruction tells the Sprite to move 10 steps in whichever direction the Sprite is pointing.
You can now test whether the instruction works by pressing the Up Arrow key on the keyboard.

You will notice that the Sprite twists round to face in the upwards direction. This would be fine if it was a boat, an animal or a car, but we want our bat to keep facing forwards. To instruct the bat Sprite to continually face to the right, click the small only face left-right button in the pane above the Script Area

Drag the Bat Sprite back down the screen and try pressing the Up Arrow key again

You can probably work out for yourself how to make another block which tells the Bat Sprite to move down the screen when the Down Arrow key is pressed - but to save time, we will use the existing Script by duplicating it.

Right-click (Ctrl-click on a Mac) on the orange Control block at the top of the script we have just created and select duplicate from the pop-up menu


Change the orange control block to read when down arrow key is pressed by choosing this option from the drop-down menu.

Change the point in direction block to read point in direction (180) down.

Now test your two Scripts by pressing the Up Arrow Key and Down Arrow Key to see if the Sprite moves up and down the screen. If not, check the blocks match those shown here.
Now we have programmed the bat to move up and down, we need something for it to hit.

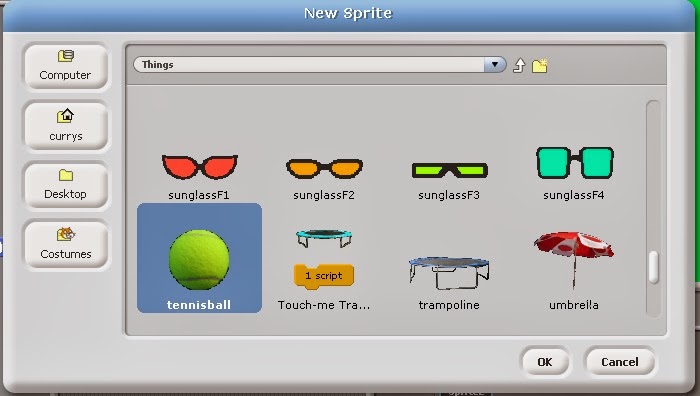
This time, instead of drawing our own ball, we will use an image from the Scratch program's library of image files.

Click on the Choose new sprite from file button in the Sprites Area


This will bring up the New Sprite Window. Double-Click on the Things folder.
Scroll down the list of images in the folder until you reach the tennisball image.

Click on it and then click the OK button.

You should now have the new tennis ball sprite showing on the Stage Area along with the bat sprite.

However, it looks a bit too large so, to shrink it, click on the Shrink sprite button above the Stage Area.

Then keep clicking on the tennis ball sprite until it has shrunk to a reasonable size.

If you feel you have overdone it, you can enlarge it by clicking the Grow Sprite button beside the Shrink Sprite button and then clicking a few times on the tennis ball sprite.

Now we need to create a script to control how the ball sprite will move.

Click on the Control button above the Blocks Palette and then from the Blocks Palette drag the when green flag clicked block into the Script Area and then drag the Forever loop block into the Script Area.

Don't attach these two blocks together yet (it doesn't matter if you do though, you can always drag them apart again).


Now click the Motion button and then drag the point towards block into the Script Area and attach it below the when green flag clicked block. From the drop down menu on this block select Sprite 2.

This tells the ball sprite that when the game starts it is to point towards the bat sprite before moving. This will make the game easier to play at the beginning.

The drag the go to x: 0 y: 0 block into the Script Area and attach it beneath the point towards block. Change the value of x: to 200 by typing in the white area on this block.

Drag the Move 10 steps block into the Script Area and put it into the Forever loop. Then change the move 10 steps to move 5 steps.


Drag the if on edge bounce block from the Blocks Palette into the Script Area and attach it to the move 5 steps block in the Forever loop.

The drag the Forever loop block and attach it to the go to x: 200 y:0 block

You can now test the script controlling the ball sprite by clicking on the Green Flag button in the right hand corner above the Stage Area.

The ball should first jump to the right of the stage ( ie x: 200, y: 0 co-ordinates) and then start moving across the stage towards the bat. When it reaches the edge of the stage area it will bounce and so-on until you press the Red button beside the Green flag button. This stops all scripts.
Our next job is to get the ball sprite to do something if it hits the bat sprite. From the Control Blocks Palette, drag the If loop block into the Script Area.

You may need to scroll down the Block Palette Area to find the If loop block as it is somewhere near the bottom.


Click on the Sensing button to bring up the Sensing Blocks in the Blocks Palette Area.

Drag the diamond shaped touching _ ? block into the diamond shaped area at the top of the If loop in the Script Area.

The click the drop down list button on the touching _? block and select Sprite 2.

This tells the ball sprite that it will need to do whatever is contained inside the If loop if it touches the bat sprite (ie Sprite 2).

We now need to program the instructions inside the If loop.

Click on the Motion button and from the Motion Blocks Palette, drag the point in direction 90 block into the Script Area and put it inside the If loop.


As we want the ball to bounce off the bat in the opposite direction to that in which it was travelling when it hit the bat, we need to do a quick calculation as to what the new direction will be.

Click the Operators button and from the Operators Block Palette drag the oval shaped _ - _ block into the oval shaped pane on the point in direction _ block in the If loop in the Script Area.

To find out the direction the ball sprite is heading when it strikes the bat sprite, firstly type 360 into the first pane of the point in direction _ - _ block in the If loop.

Then bring up the Motion Blocks Palette by clicking the Motion button and from this drag the direction block into second pane of the the point in direction 360 - _ block

This tells the ball sprite that it needs to point in the opposite direction when it strikes the bat sprite (ie 360 degrees minus the direction it is now travelling).

Drag the If loop into the Forever loop so it attaches below the if on edge bounce block.

Drag the Forever loop up and attach it to the blocks below the when green flag clicked block.

The script for the ball sprite should now look like this.

You can test this new script by clicking the green flag button and watching what happens when the ball hits the bat.

When you are ready, stop all scripts by clicking the big red button beside the green flag button.

Now, let's add a sound when the bat hits the ball.

Click on the Sounds tab above the Script Area for the ball sprite.

The click on the Import button (or you could record your own sound if you prefer).

In the Import Sound pop-up window, double-click the Effects folder and from from this select the Pop file and click OK.
Click the Sound button above the Blocks Palette Area and drag the play sound Pop block into the Script Area and insert it into the If loop.

It doesn't matter if it attaches itself above or below the point in direction block as long as it is inside the loop (it doesn't matter if the pop sound comes before or after the ball sprite changes direction).

Click the Green Flag button to check this change to the script.

Click the Red button to stop all scripts when you are ready

Now we have programmed the sprites to do what we want, it's time to add some means of presenting this player with a score. For this we will need a variable called Score.

Click the Variables button above the Blocks Palette Area.

Then click the Make a Variable button

In the Pop-up window type Score for the variable name and then click the OK button.


You will see that the Score variable is displayed as a counter in the Stage Area. This can be removed by clicking the checkbox beside the Score variable block in the Blocks Palette Area

Drag set Score to 0 block from the Blocks Palette into the Script Area and attach it to the existing script under the go to x: 200 y: 0 block

Drag the change Score by 1 block from the Blocks Palette Area into If loop in the script (again it doesn't matter where as long as it is inside the loop).

You can check the effect of this change by clicking the Green Flag button to play the game and then the Red button to stop playing.
We now need to detect when we have missed hitting the ball.

Firstly, click the Control button and drag a new If loop into the Script Area from the Control Block Palette Area. For now do not attach it to the script.

Click the Sensing button and from the Sensing Control Block Palette, drag the touching colour _ ? block into the space at the top of the If loop block.


This If loop is going to detect whether the ball sprite touches the white line behind the bat sprite (ie if the bat has missed hitting the ball).

To ensure that the colour which the If loop detects is accurate, click in the colour pane in the touching colour _ ? block in the If loop block and then click on the white line on the Stage Area with the eye dropper mouse-pointer.
Import the BellToll sound file into the Sounds part of the Script Area (as above) - or any other sound which you think is appropriate.

Click the Sound button and then drag the play sound BellToll until done block from the Sound Block Palette into the new If loop in the Script Area.

Click the Control button and drag the  Stop All block from the Block Palette into the If loop so it comes after the play sound BellToll until done block. It is important that these are in the correct order otherwise the script will stop before the sound has played.


Drag the new If loop into the Forever loop into the when Green Flag clicked script as shown.

As it is inside the Forever loop the script will keep checking whether the ball sprite is touching the white line as long as the game is being played.

You can now play the game by clicking the Green Flag button to see what happens if you miss the ball.

Next, it would be useful to record the Highest score and see if you can beat it it each time you play.

This will require another If loop in the script. This time we will need to drag the Greater Than Operator block into the space in the header for the If loop.


Make a new variable called High Score and then drag the blocks into the If loop to make the following statement:

If Score > High score
set High Score to Score

This new If loop should now be dragged inside the If touching colour _? loop in the script (as shown).

It would still work outside this loop but the High Score is usually updated at the end of the game rather than during the game.

You could also drag the Score and High Score displays in the Stage Area so they do not hide the top of the screen where the bat needs to hit the ball.
Finally, to make the game more difficult for those who become skilful, let's make the bat smaller if they get a score higher than 15.

Click on the button for the bat sprite (Sprite 2) in the Sprite Area.

Then click on the Costumes tab

Click on the Paint button beside the New costume label. In the Paint Editor window, draw a shorter bat than the first one and then click OK

In the Script Area for the bat sprite, using your knowledge of  programming create a new script:

When Green Flag clicked
Forever
If High Score > 15
switch to costume costume 2

as shown

 Note: the switch to costume block is in the Looks Blocks Palette


Extensions 

 To extend the game further you could:
  • Increase the speed of the ball as the high score increases
  • Add another bat so the game becomes a two-player game
  • Add a random element to the direction in which the ball bounces off the bat

Space Invader

Introduction

This game is based very loosely on the classic early shootem-up game of Space Invaders. In this game there is only one alien, but if you want to make the game more complex you could duplicate the alien as many times as you wish.

List of techniques

  • Importing backgrounds
  • Painting Sprites
  • Keyboard input for moving sprites
  • Random movement of a Sprite
  • Duplicating Scripts
  • Importing and playing sounds
  • Sprite on Sprite collision detection
  • Changing Sprite costumes in response to a collision
  • Score variable
  • Forever loop
  • If loop
  • Green Flag Scripts


 Our first task is to provide a background for the game. We will import a readymade background - but we could draw our own.

Once Scratch has loaded, click on the Stage icon in the Sprites List Area.

Then click on the Backgrounds tab above the Script Area

And then click the Import button
In the pop-up Import Background window, double-click the Nature folder and then scroll down until you find the stars image file. Click this and then click OK

The Stage should now have a starry background.

Our next task is to create a sprite which will become the laser cannon which we can move and fire to shoot at the aliens.

Click the Paint new sprite button above the Sprite List Area.
To keep things simple we will draw a triangle for our laser cannon (you could draw any shape you like).

Click on the colour you want in the Colour Palette (I'm using a light green). Then click on the Line Draw tool on the Toolbar.

On the canvas draw three lines to form a triangle (or any shape you wish)


Click on the Fill bucket tool on the Toolbar.

Click somewhere in the centre of the triangle shape to fill it with colour. If the paint leaks out and fills the whole screen, click the Undo button and use the paintbrush tool or line tool to close any gaps in the shape before filling it again.

Then click the OK button
We'll now delete the Scratch the Cat sprite. We could have deleted it earlier (or later) or changed its shape.

Right-click (Ctrl-click on a Mac) on the Sprite itself or its icon in the Sprite List Area.

In the pop-up list click on delete.


If you feel your laser cannon is too large, you can shrink it by clicking on the Shrink Sprite button above the Stage Area and then clicking several times on the Sprite in the Stage Area.

Next to the Shrink Sprite button is the Grow Sprite button which you can use if you accidentally shrink your Sprite too much.
Now we have created a Sprite, we can begin to program it.

Click on the Control button above the Blocks Palette Area

From the Blocks Palette Area, drag the when space key pressed block into the Script Area


Click the drop down menu on the when space key pressed block which you have just dragged into the Script Area

From the drop down list, click on right arrow

This tells the Script to do something when the right arrow key is pressed on the keyboard
Click the Motion button above the Blocks Palette

From the Blocks Palette drag the point in direction 90 block into the Script Area and attach it to the when right arrow key is pressed block

Click the drop down menu on this block (ie on the 90) and from the list click on (90) right. It is not essential to do this as it is already set to point right.


From the Blocks Palette, drag the move 10 steps block into the Script Area and attach it below the point in direction 90 block in your script

You can now check how this script is working by pressing the right arrow on your keyboard. You can drag the Sprite back to the left if it reaches the edge of the screen.
textTo create a script for the left arrow key we could repeat the above steps. A quicker way is to duplicate the script we have just written and then change it.

Right-click (Ctrl-click on a Mac) on the when right arrow key pressed block and on the pop-up menu click duplicate


On the new script, change right arrow to left arrow in the when right arrow key pressed block

Change the point in direction 90 block to read point in direction (-90) left

You can now check these two scripts by pressing the left and right arrow keys to move your laser cannon across the bottom of the screen.


You will find that the cannon sprite flips upside down when travelling to the left. To prevent this click on the Only face left-right button above the Script Area text

Now we need to create a laser bullet for the cannon to fire. Click the paint new sprite button above the Sprite List Area (as in step 3).

Click on the colour you would like to use (I'm using yellow) in the Colour Palette and then using either the Line Tool or the Paintbrush Tool, draw a short vertical line on the canvas. Then click OK.
We now need to write a script to control this Sprite.

Click on the Control button above the Blocks Palette and from the Blocks Palette drag the when space key pressed block into the Script Area.

First of all we must tell the bullet Sprite to go to the same place on the Stage as the laser cannon Sprite (ie Sprite 2).

Click on the Motion button above the Blocks Palette and from the Blocks Palette drag the go to _  block into the Script Area and attach it below the when space key pressed block.

Click on the drop down menu on this block and then click on Sprite 2 in the menu


Now drag the point in direction 90 block from the Blocks Palette into the Script Area and attach it beneath the go to Sprite 2 block

Click on the drop down menu on this block (ie the 90) and from the menu select (0) up


From the Control Blocks Palette Area drag the repeat 10 loop block into the Script Area and attach it beneath the point in direction 0 block

Change the 10 to 50 on the repeat block in the script by clicking in the pane, deleting the 10 and typing 50
From the Motion Blocks Palette, drag the move 10 steps block into the Script Area and put it into the repeat 50 loop

This tells the bullet to keep moving up the screen 10 steps, fifty times (ie a total of 500 steps). This is far more than is needed but it makes sure the bullet reaches the top of the screen.

You can now test this Script by moving the cannon around with the arrow keys and firing the laser with the space bar.


It would be good if the laser cannon made a noise. So, click the Sounds tab above the Script Area and then click the Import button.

We could record our own sound effect but this time we will use one which comes with the Scratch program

Double-click the Electronic folder to open it and then click on the Laser1 sound file. Then click OK.

Click on the Scripts tab to show the Script for this Sprite

From the Sound Blocks Palette, drag the play sound Laser1 block into the Script Area and attach it beneath the point in direction 0 block.

It should insert itself if you drag the block to just below the point in direction 0 block. It doesn't matter if it is above the point in direction 0 block as long as it isn't inside the repeat 50 loop otherwise the laser sound will play 50 times as it travels up the screen.

Now when you press the space bar, your laser should make a sound when it is fired.
Now we need to make something for the laser to fire at. Press the paint a new sprite button (as in Step 3 above) and then use the paint tools to create something alien-looking. It doesn't matter if you make it too large, you can always shrink it.

Click the OK button when you are finished being creative.


Our alien Sprite needs two costumes: one its normal cuddly self and another showing it being blown-up after being hit by the laser bullet.

Click on the Costumes tab above the Script Area for this Sprite and then click the Copy button
You will now get a copy of the Sprite's original costume (called costume 2). Click the Edit button for this new costume.

Use the paint tools to show a blown-up alien.

Click OK when you are finished.
Now we need a Script for the Alien Sprite to move it around the screen and detect when it has been hit by the bullet.

Click on the Scripts tab above the Scripts Area and from the Control Blocks Palette drag the when Green Flag clicked block into the Script Area

Then drag the Forever loop block from the Blocks Palette into the Script Area and attach it beneath the when Green Flag clicked block.
From the Motion Blocks Palette, drag the go to x: _ y:_ block into the Script Area and insert it into the Forever loop.
Change the co-ordinates in the go to x: _ y:_ block so the block now says go to x: 0 y: 110

Press the Green Flag button which is above the Stage Area on the right.

If you try dragging the alien sprite around the stage it will keep shooting back to its (0,110) co-ordinate.

Press the Red button next to the Green Flag button to stop all scripts from running.


The game would be extremely easy if every time the alien was shot it reappeared in the same location. We will now make it appear in a random place on the screen.

From the Operators Block Palette, drag the pick random 1 to 10 block into the go to x: 0 Y: 110 block to replace the 0 after x:

Change the range of numbers in the pick random block so it reads pick random -200 to 200
We will leave the y: value at 110 so it always appears the same distance away from the cannon each time (you could put another random block in the y: co-ordinate pane if you wish).

From the Control Blocks Palette, drag the wait 1 secs block so it is inside the Forever loop below the go to x: pick random -200 to 200 y:110 block
We will now make it stay on the screen for a random amount of time, between 1 and 5 seconds, before moving to a new location.

From the Operators Block Palette, drag the random 1 to 10 block into the wait 1 secs block in the Script Area to replace the 1

Change the range so the block now reads wait [pick random 1 to 5] secs

You can now test this script by clicking on the Green Flag button. The alien should keep re-appearing at different locations after varying periods of time. Press the Red button when done.
The next stage is it detect when the bullet sprite  hits and change the costume of the alien sprite.

From the Control Blocks Palette, drag the If loop block into the Script Area.

For the moment there is no need to attach it to the script

From the Sensing Blocks Palette, drag the diamond-shaped touching _ ? block into the diamond shaped pane at the head of the If loop block in the Script Area.

Click the drop-down list on the touching _ ? block and from the list select Sprite 3 (ie the bullet Sprite)

This instruction check if the alien sprite is touching the bullet sprite.
From the Looks Blocks Palette drag the switch to costume block into the Script Area and insert it into the main script just below the when Green Flag clicked block.

If necessary, change the block so its says switch to costume [costume1]

Now drag the switch to costume block from the Blocks Palette and insert it into the If loop in the Script Area

If necessary, change the block so it reads switch to costume [costume2]

Now to add a sound effect.

Click the Sounds tab above the Script Area. Double-click the Electronic folder and then click on the Screech sound file.

Now click the OK button
Click the Scripts tab above the Script Area to return to the script

From the Sound Blocks Palette, drag the play sound Screech until done block into the Script Area and insert it into If loop after the switch to costume [costume2] block


From the Control Blocks Palette, drag the when Green Flag clicked block  into the Script Area

Now drag the Forever loop from the Blocks Palette and attach it to the when Green Flag clicked block

Drag the If loop into the Forever loop

You can test this new Script by pressing the Green Flag button above the Stage Area

You'll see that the problem is that when the alien re-appears at its next location it is still in its blown-up state (costume 2). After being hit we need the show the blown-up costume for a while (until the Screech sound ends) and then return the Alien Sprite to its original costume (costume 1)


From the Looks Blocks Palette, drag the switch to costume block into the Script Area and insert it into the If loop below the play sound Screech until done block

If necessary, change the block so it reads switch to costume [costume1]
We can now do a bit of tidying-up.

Drag the Forever loop block down from the switch to costume [costume1] block, and then remove the switch to costume [costume1] block by dragging it into the Blocks Palette Area

Now drag the switch to costume [costume1] block from the If loop and insert it into the Forever loop above the go to x: pick random -200 to 200 y: 110 block

Re-attach the Forever loop block to the when Green Flag clicked block


Last of all we need to add some sort of scoring system.

Click on the Variables button and then the Make a variable button

In the pop-up window, type Score as the variable name and then press OK
Drag the set score to 0 block into the Script Area and insert it into the lower of the two Scripts just below the when Green Flag clicked block

Now drag the change Score by 1 into the Script Area and insert it into the If loop (anywhere in the loop will do)


To give the player time to see the effect of their successful shot, drag the wait 1 secs block from the Control Blocks Palette Area to the Script Area and insert it into the If loop below the change Score by 1 block
To make the game a little more challenging, let's add a Script to enable the Alien Sprite to fire at the Laser Cannon Sprite.

Click on the Paint new sprite button and create an alien-looking laser bolt.

You could duplicate the existing laser bullet sprite (Sprite 3) to save time but you will then need to edit the script for the new laser bolt sprite.


By now you could probably create your own Script for the Alien laser bolt Sprite.

Here is a simple Script you could use.

Alternatively, you might want to add a random wait block at the start of the forever loop
You will also need to create a blown-up costume for the Laser Cannon Sprite and add to its Script to detect and respond when it is hit by the Alien's Laser Bolt Sprite - here is one example of how the script can be modified.


Extensions

  • You could add a variable to decrease the number of lives each time the Laser Cannon Sprite has been hit.
  • You could add a variable to show a High Score 
  • You could increase the number of aliens (simply duplicate the Alien Sprite)
  • You could improve the procedure for the Alien Sprite to make it move across and down the screen as in the original version of the game